Server-to-Server Registration Tokens
Last updated:February 19, 2025
This Server-to-Server guide describes how you can store card and non-card data and subsequently use the
stored details to perform payment transactions.
Use cases
Standalone tokenization
The merchant collects card data from shopper and initiates the registration tokenization. No payment request/flow involved.
A registration token is synchronously provisioned and returned to the merchant. The registration token can then be used in
subsequent payments.
How it works
Send the tokenization request with the collected card data.
OPTIONAL
Send payment using the stored registration token.
1. Create the token
Perform a server-to-server POST request with the required customer data, but excluding paymentType. The response to
a successful request is an id that should be stored and used in subsequent payments.
Sample request:
2. Send payment using the token
Perform a server-to-server POST request over the registration token retrieved in the previous step.
Alternatively, use one-click payment to authorize the payment with a
selected stored registration token.
Sample request:
Tokenization during payment
The merchant collects card data from shopper and initiates the registration tokenization along an account verification
(zero amount auth) or initial purchase. A registration token is synchronously provisioned and returned to the merchant once
payment is complete. The registration token can then be used in subsequent payments.
How it works
Send the payment request with the collected card data asking for the card to be tokenized once the payment ends successfully.
1. Create the token during payment
Perform a server-to-server POST request with createRegistration=true and all required payment
and customer data, including payment type, amount and currency. The response to a successful request is a registrationId
that should be stored and used in subsequent payments.
Sample request:
One-click payment
Speed up of the checkout process by re-using the raw card data a shopper entered previously. When the shopper returns on the
merchant’s website an unscheduled one-click purchase with one of the saved registration tokens is performed. The cardholder
initiated (CIT) payment is authorized with the real card data.
How it works
Retrieve registration token id associated with authenticated shopper.
Show the stored registration tokens in the checkout form
Send the payment over the selected registration token once shopper checkouts.
1. Authenticate the customer
You will need to authenticate the shopper against your records to obtain the respective registration
tokens associated with the shopper's account. To prepare showing the one-click payment form you should retrieve
the additional stored token data points that should enable the shopper checking out with the desired stored card:
- registration token identifier
- account brand
- last four digits of account number
- expiry date (if applicable)
2. Show the checkout form
Once you were able to retrieve the stored token information, you should offer them as options to shopper for checkout.
We recommend offering normal payment methods alongside your One-Click payment page.
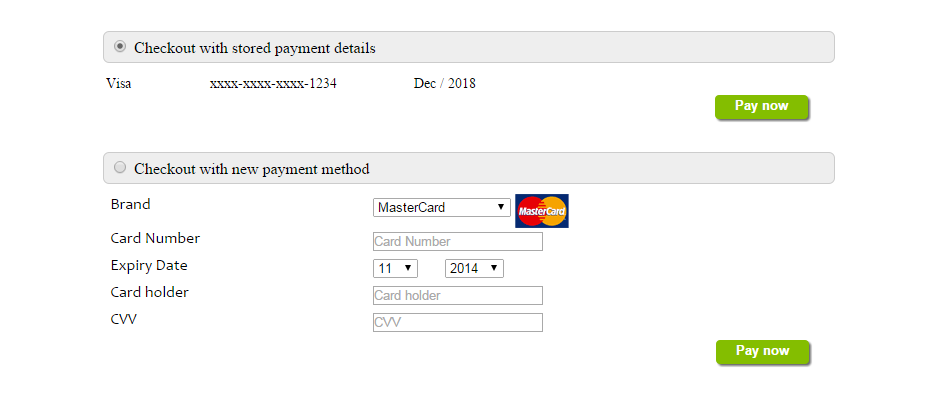
Show HTML example
<!DOCTYPE HTML>
<html>
  <head>
	<script>
	var wpwlOptions = {
		style: "card"
	}
	</script>
	<script src="https://eu-test.oppwa.com/v1/paymentWidgets.js?checkoutId={checkoutId}"></script>
	<style>
		body { background-color:white; width:720px; margin:auto;padding:10px;font-size:14px;}
		h2 { margin-top:25px;margin-bottom:10px;padding:5px;width:100%;background-color:#eee;
		border:1px solid #ccc;border-radius:6px;font-size: 16px;font-weight:normal; }
	</style>
  </head>
  <body>
  <h2><input type="radio" checked="checked" /> Checkout with stored payment details</h2>
	<table>
		<tr>
			<td width="100px">Visa</td>
			<td width="200px">xxxx-xxxx-xxxx-1234</td>
			<td width="200px">Dec / 2018</td>
		</tr>
	</table>
	<div><button type="submit" name="pay" class="myButton">Pay now</button></div><br /><br />
  <h2><input type="radio" /> Checkout with new payment method</h2>
	<form action="http://localhost/pay.html">
	  MASTER VISA AMEX CHINAUNIONPAY
	</form>
  </body>
</html>
3. Send the payment
When the shopper checks out via one-click form, all you need to do is sending a server-to-server POST request for a
new payment over the selected registration token.
Sample request:
Payment with token
The merchant submits a subsequent payment based on the card-on-file agreement available with the shopper. It can be a
cardholder (CIT) or merchant (MIT) initiated payment transaction.
How it works
Send the payment request using the stored registration token.
1. Send payment using the token
Perform a server-to-server POST request over the stored registration token with all required payment and customer data,
including payment type, amount and currency.
Sample request:
Token deletion
The merchant initiates a deletion request on the registration token. The deregistered token cannot be used anymore in subsequent payments.
How it works
Send the delete request to invalidate the registration token.
1. Deregister stored card data
Perform a server-to-server DELETE request over the stored registration token.
Sample request:
Token extension
The merchant has business requirements to keep unused registration tokens alive for a longer period than stipulated by the
Data Retention Policy. The default retention period can get extended for up
to 24-months. It applies to both card and non-card registration tokens. Examples:
- A card based registration token is generated today with expiry date 1-Feb-Y1. By default, the token is
deleted 14 months after card expiration which is 1-Apr-Y2. If there is a good reason to keep the
registration token for longer period, the 14 months retention period can be adjusted.
- Same rule applies for a non-card based registration token. However, the token is getting
deleted 14 months after the last transaction performed with that registration token.
For further details, please read
Data Retention Policy.
How it works
Send the life extension request to retain the token for a longer period of time.
1. Extend token retention period
Perform a server-to-server POST request over the stored registration token to extend its retention. No additional parameters
are required in the request.
Sample request:
See also

